
Finite Bobs
Summary #
There's a lot to talk about from our No Bounds demo, for sure, but one part I was particularly happy with, out of those that I made myself, was the Finite Bobs part - or "Not Bob's Bobs" as we called it.
This was similar to the old "infinite bobs" effects that the Amiga is famous for - but we clear the end of the bobs, out of sight, so that it's actually "finite bobs" or a "bob trail", I guess?
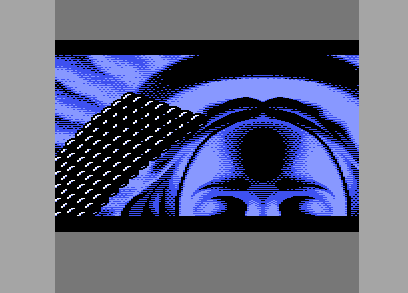
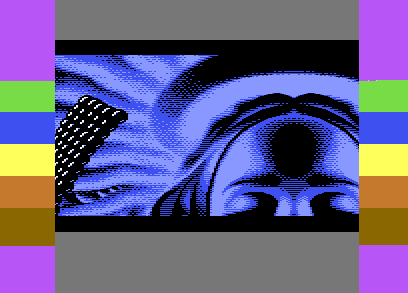
Here's the effect in action, from our No Bounds demo:-
There are several things coming together to make this part work so let's take a look at them in turn...
The Background #
The background image, seen below, was drawn by the amazing Razorback (Kristoffer Frisk). 512x448px in size and using only 3 colours in total.

In order to fit everything in memory, I asked that he make a pic that was mirrored along the centre - so this is what he came up with. I also made it a little more restrictive than usual in that it should be just 3 colours rather than the typical 4. The reason being that I wanted to reserve an extra colour (white) that my bobs could use to make sure that they "popped out" on top of the background. We played with a few colour combinations here, including red bobs, green, etc ... all looked pretty good - but having the bobs be mostly black with little highlights turned out best (thanks to Ksubi for the suggestion here).
We display the picture using charsets. 14 of them at 512x32px (64x4 chars) each:-


That's 28k of data which we need to spread across 2 VIC banks, just for what you see on-screen.
AGSP Background Scrolling #
To get this moving, and leaving us with enough spare CPU to put our effect on top, we use AGSP ("Any Given Screen Position"). That is, we use linecrunch (to give quick vertical scrolling) plus VSP (horizontal scrolling).
First, let's consider what we might need for a typical screen. Since the picture is broken up into 64x4 char blocks, if we're displaying the top-left of the picture, our screen would be showing something like:-
| Col 0 | Col 1 | Col 2 | Col 36 | Col 37 | Col 38 | Col 39 | ||
|---|---|---|---|---|---|---|---|---|
| row 0 | $00 | $01 | $02 | ... | $24 | $25 | $26 | $27 |
| row 1 | $40 | $41 | $42 | ... | $64 | $65 | $66 | $67 |
| row 2 | $80 | $81 | $82 | ... | $A4 | $A5 | $A6 | $A7 |
| row 3 | $C0 | $C1 | $C2 | ... | $E4 | $E5 | $E6 | $E7 |
| row 4 | $00 | $01 | $02 | ... | $24 | $25 | $26 | $27 |
| ... | ... | ... | ... | ... | ... | ... | ... | ... |
| row 23 | $C0 | $C1 | $C2 | ... | $E4 | $E5 | $E6 | $E7 |
| row 24 | $00 | $01 | $02 | ... | $24 | $25 | $26 | $27 |
Since the char rows repeat every 4 lines, vertical scrolling becomes easy - if we agree not to show the full screen height, in fact, we can get away without updating any screen rows at all - we just use 32px of vertical movement (linecrunch) couple with setting $d018 appropriately at the splits.
Horizontally, in order to display the full 512px wide image on our 304px (38 char coloumns) wide screen, we need to be able to scroll by 0-207 pixels (0-25 chars plus the 0-7px smooth scroll). Remember that the screen automatically loses 8px (1 char) on the left due to the borders being pulled in on both sides.
So, we have our plan. Our AGSP code that achieved this is below. Important note: when setting $d011, we use illegal graphic modes to stop corrupted pixels appearing on screen - with the illegal modes, we will simply get black pixels (and hence why, in my demo part, I went with a screen design where I had thick black bars at top and bottom).
.align 256

IRQ_AGSP:

    IRQManager_BeginIRQ(1, 0) //; our macro for initialising the IRQ, pushing registers and stabilising the rasterbeam

    lda #$57 //; nb. invalid graphics mode
    ldy #$51 //; nb. invalid graphics mode
    nop
    nop $ff

  LCDistance:
    ldx #0
  loop0:
    beq endloop0
    sty $d011
    iny
    nop
    nop
    nop
    .for (var rep = 0; rep < 6; rep++)
    {
      pha
      pla
    }
    lda #$57 //; nb. invalid graphics mode
    dex
    bpl loop0
  endloop0:
    sta $d011

  VSPDistance:
    ldx #$ff
    stx VSPDist + 1
    nop
    bit $ff

    lda #$36
  WaitD012:
    cmp $d012
    bne WaitD012

  VSPDist:
    beq Next
  Next:
    .for (var i = 0; i < 19; i++)
    {
      lda #$a9
    }

    lda #$a5
    nop
    dec $d011
    inc $d011

  SetD011Value:
    lda #$00
    sta VIC_D011

  SetScreenColour:
    lda #ColourDark
    sta VIC_ScreenColour
    lda #$3d
    sta VIC_D012
    lda #<IRQ_AGSPB
    sta ZP_IRQVECTOR + 1
    lda #>IRQ_AGSPB
    sta ZP_IRQVECTOR + 2

    IRQManager_EndIRQ()
    rti
Aligning the function (".align 256" at the very top) will save you headaches later on.. you need to make sure that all the branches (bne, bpl, bmi, whatever) have predictable timing. If your code layout changes so that a branch is jumping across pages (256-byte boundaries), stuff will just start breaking, badly, and you'll waste time trying to figure out what's happened. The reason for all this is that branches cost an extra cycle when jumping across pages - and this is very easy to forget. I wish there was a better way to do this in ASM, while keeping code clean and tidy.
Anyway.. before this IRQ is called, we need to fill in the linecrunch distance (number of char rows to 'crunch', ie. 0, 1, 2 or 3) to "LCDistance + 1" and the VSP distance (number of char columns to shift) to "VSPDistance + 1". If copy/pasting this into your own code, note that you'll most likely need to make small timing adjustments, particularly at the top of the function, to get all the D011 writes happening at the right points within your own demo setup.
With this working, we also need to update the screen columns at the edge of the screen to bring in the correct data. VSP works by making the VIC "forget" about the chars at the top-left of the screen..
As an example ... If your screen is at $0400-07e7 normally, and you do 4 chars' worth of VSP, your new screen will be $0404-07eb. The majority of the screen has moved almost for free - but you'll now see that, for every screen line, the left hand side has moved up and to the right. What you now see on screen will be using these chars:-
| Col 4 | Col 5 | Col 6 | Col 40 | Col 41 | Col 42 | Col 43 | ||
|---|---|---|---|---|---|---|---|---|
| row 0 | $04 | $05 | $06 | ... | $40 | $41 | $42 | $43 |
| row 1 | $44 | $45 | $46 | ... | $80 | $81 | $82 | $83 |
| row 2 | $84 | $85 | $86 | ... | $C0 | $C1 | $C2 | $C3 |
| row 3 | $C4 | $C5 | $C6 | ... | $00 | $01 | $02 | $03 |
| row 4 | $04 | $05 | $06 | ... | $40 | $41 | $42 | $43 |
| ... | ... | ... | ... | ... | ... | ... | ... | ... |
| row 23 | $C4 | $C5 | $C6 | ... | $00 | $01 | $02 | $03 |
| row 24 | $04 | $05 | $06 | ... | $40 | $41 | $42 | $43 |
So we need something like the below to update some of the screen columns - basically, the ones that are scrolling in under the border on left or right. Note that we update 2 screens because we've spread our character sets across 2 banks and, naturally, the screen needs to be in both banks as well.
//; A = value to write, X = screen column to update

FillVerticalScreenLine:

		.for (var i = 0; i < 24; i += 4)
		{
			sta ScreenAddress0 + ( i * 40), x
			sta ScreenAddress1 + ( i * 40), x
		}
		eor #$40
		.for (var i = 1; i < 24; i += 4)
		{
			sta ScreenAddress0 + ( i * 40), x
			sta ScreenAddress1 + ( i * 40), x
		}
		eor #$c0
		.for (var i = 2; i < 24; i += 4)
		{
			sta ScreenAddress0 + ( i * 40), x
			sta ScreenAddress1 + ( i * 40), x
		}
		eor #$40
		.for (var i = 3; i < 24; i += 4)
		{
			sta ScreenAddress0 + ( i * 40), x
			sta ScreenAddress1 + ( i * 40), x
		}

		rts
In our particular case, it just so happens that the value that we want to be writing into these columns is identical to the screen column that we should be write to.. so we use something like this:-
  PicMovingRight:

    lda VSPDistance + 1
    jmp DoVertLineFill

  PicMovingLeft:
    lda VSPDistance + 1
    clc
    adc #39

  DoVertLineFill:
    tax
    jsr FillVerticalScreenLine
Done right, for the example above where we've done 4 chars' worth of VSP, what we see on screen should now be:-
| Col 4 | Col 5 | Col 6 | Col 40 | Col 41 | Col 42 | Col 43 | ||
|---|---|---|---|---|---|---|---|---|
| row 0 | $04 | $05 | $06 | ... | $28 | $29 | *$2A | $2B |
| row 1 | $44 | $45 | $46 | ... | $68 | $69 | $6A | $6B |
| row 2 | $84 | $85 | $86 | ... | $A8 | $A9 | $AA | $AB |
| row 3 | $C4 | $C5 | $C6 | ... | $E8 | $E9 | $EA | $EB |
| row 4 | $04 | $05 | $06 | ... | $28 | $29 | $2A | $2B |
| ... | ... | ... | ... | ... | ... | ... | ... | ... |
| row 23 | $C4 | $C5 | $C6 | ... | $E8 | $E9 | $EA | $EB |
| row 24 | $04 | $05 | $06 | ... | $28 | $29 | $2A | $2B |
So, with the addition of setting $d016 for 0-7px smooth scrolling (if you've read this far and not fallen asleep, I think I can probably leave that as an exercise for the reader :p), we now have AGSP working as it needs to.
Screen Character Set Splitting #
Our picture is 448px tall.. and our screen much less. So we now need to implement character set splitting. That is, updating $d018 at various points on the screen (spaced out by exactly 32px) to make sure we display the correct character set.
For this, I have two separate IRQ functions. The first, below, is the one that's setup at the end of the AGSP IRQ above. This one occurs at the top of the visible screen area and sets the correct character set for there. It also turns off the "illegal display mode" so that the picture actually starts to be drawn.
.align 128

IRQ_AGSPB:

    IRQManager_BeginIRQ(1, 0)

  SetD011ValueB:
    lda #$00

    ldx #$3f
  D012WaitToShowScreen:
    cpx VIC_D012
    bne D012WaitToShowScreen

    sta VIC_D011

  SetD012Value:
    ldx #$00
  WaitForFirstD012:
    cpx VIC_D012
    bne WaitForFirstD012

  FirstIndex:
    ldy #1
    lda D018Values, y
    sta NextD018Value + 1
    lda DD02Values, y
    sta NextDD02Value + 1
    iny
    sty NextIndex + 1

    compensateForJitter(-9)

  FirstDD02Value:
    ldy #$00
  FirstD018Value:
    lda #$00
    sta VIC_D018
    sty VIC_DD02
    stx RestX + 1

  RestX:
    lda #$00
    clc
    adc #32
    sta NextD012 + 1
    sta VIC_D012
    ldx #<IRQ_UpdateD018
    ldy #>IRQ_UpdateD018
    stx ZP_IRQVECTOR + 1
    sty ZP_IRQVECTOR + 2

    IRQManager_EndIRQ()

    rti
"D018Values" and "DD02Values" are simply tables giving the correct values for pointing at our screen, character set and VIC bank.
Our second function deals with all the other splits down the screen:-
.align 128

IRQ_UpdateD018:

		IRQManager_BeginIRQ(1, 0)

	NextD018Value:
		ldx #D018Value1
		stx VIC_D018
	NextDD02Value:
		lda #DD02Value0
		sta VIC_DD02

	NextIndex:
		ldy #1
		lda D018Values, y
		sta NextD018Value + 1
		lda DD02Values, y
		sta NextDD02Value + 1
		inc NextIndex + 1

		ldx #<IRQ_UpdateD018
		ldy #>IRQ_UpdateD018

	NextD012:
		lda #$00
		clc
		adc #32
		sta NextD012 + 1

		dec CallCount
		bne AllGood

		lda #$f8
		ldx #<IRQ_Main
		ldy #>IRQ_Main
		bne EndIRQ

	AllGood:
		lda NextD012 + 1

	EndIRQ:
		sta VIC_D012
		stx ZP_IRQVECTOR + 1
		sty ZP_IRQVECTOR + 2

		IRQManager_EndIRQ()
		rti
CallCount is setup within our main IRQ, each frame, to be "4"... so, with the intial set in the first function, and the 4 from the second, plus an additional set that we do "off-screen", we're setting $d018 6 times per frame. We have a visible screen height of 161px during the part - so we will always have 6 character sets visible on screen, even if only 1 pixel of one of them.
An example frame showing where we change $d018 to change the visible charset:-
With the AGSP and $d018 splits working, we just needed to clean the bottom of the screen. As the linecrunch is bringing in "strange" and offset data, we want to cover that section up. For ease, I simply placed and X and Y expanded black sprites down there, neatly concealing things. Here's how it looks without those sprites:-

With all that done, it's very easy of course to just hook up some sinus movement patterns for both X and Y.
Bob Plotting #
Now we come to the interesting part. The whole reason for splitting the screen in this way, for me (maybe somebody has a better and simpler method?), was so that I could blit the bobs directly into the character set data with ease.
My original idea was actually to go with an infinite bobs effect. This is similar to the final effect that we ended up with - but it would be simpler, like Amiga demos, in that we wouldn't need to clear the end of the bob trail - we would just let it build up with more and more bobs, drawing over the screen. I wasn't quite sure.. I thought it might look ok - but there was quite a large risk that it could look awful. I'll save you the time of trying this: yes, it looks awful. At this point I very nearly gave up (!), it was that bad. But I wondered, still, whether something like Bob's Bobs might work?
Interlude #
I should at this point show you a few demos that were doing similar things and inspired us. The first is, of course, Bob's Bobs. He's done this effect a few times - but let's take a look at the one in We Come In Peace from Censor Design and friends:-
The first time I saw this effect my jaw totally dropped. It was released at Revision 2018 - the perfect party for it. It of course won the oldschool demo compo - I can only imagine the shock that all the Amiga fans at Revision would've experienced in seeing this on the less-powerful C64 ;-)
Anyway, Bob's Bobs is very similar to Infinite Bobs routines - but it clears the end of the trail. It also, actually, gets away without having multiple frames of animation. Regular Infinite Bobs routines need at least 3, ideally more, frames in order that they don't simply look like the screen is being "stamped" with bobs. Bob gets away with this by swinging the screen around wildly with AGSP, following the fast-moving bobs. By making sure that there's an end of the trail that's off screen, away from the direction of travel, he's also able to invisibly and quickly clear the end of the bob trail.. all adding up to this awesome effect.
Bob's bobs are always plotted onto a blank canvas, though, whether that be bitmap, chars or sprites - I believe he's done all of these in different demos.
Hoaxers, in 2016, made a different effect in their demo fREUd (yes, you needed an REU in order to run this demo).
With a REU attached, here's what you get:-
(fantastic graphics here by Joe by the way)
So this one's Infinite Bobs over a background. It does have multiple frames, though, which is why they can do the relatively slow movement - and why the bobs can also animate each frame (they simply blit a different animation frame of the bob into each of their frames). I'll never say "never" (hi, Crossbow, HCL, .. ;p) but, yeah, I can't imagine how this could ever be possible on an unexpanded C64.
To fit with the theme of our demo we were thinking to call out Bob (or Censor Design) and Hoaxers in our demo, before the part.. along the lines of "No Background For Censor" and "Hoaxers Needed REU". For various reasons we couldn't (more to do with time than with us wanting to be kind ;p).
So, yeah, some great inspiration for us here from these two demos. I just needed to find out whether having a bob trail plotted onto a moving background would break the illusion that it was a moving trail. A sensible man might've prototyped this on PC first, of course - I'm not that man ;p. Next time I will be - because I'd very nearly spent a serious amount of time on an effect that, simply, would look terrible.
Back to the Bob Plotting #
Sorry about that...
So, yeah, let's see how we deal with plotting the bobs. The bobs can move pretty much anywhere within the image and, since it's a multicolour image, they just need to move in 2px increments in X of course.
The solution that I used for this was to do 2 things. I fully unrolled the bob-plot, actually using the bob graphic data within the generated function, and created 4 versions of the function for the 4 smooth-pixel coordinates that the bob could have (0, 2, 4 or 6).
Here's the bob by the way:-

Below is the C++ code that was used to generate the ASM .. it's not the full code, of course, I have image classes and code-generation classes that this calls into, as described in my other blog posts, but this gives you the basis. By having this in C++, I'm easily able to change the bob image to try out different ideas.
void InfiniteBobs_ConvertBobToASM(char* InBobImageFilename, LPTSTR OutBobASMFilename)
{
	static const int NumBobs = 4;

	GPIMAGE BobImage(InBobImageFilename);

	int BobWidth = BobImage.Width;
	int BobHeight = BobImage.Height;
	int BobCharWidth = (BobWidth + 7) / 8;

	unsigned char* OutBob = new unsigned char [2 * NumBobs * BobHeight * BobCharWidth];

	CodeGen OutCodeASM(OutBobASMFilename);

	for (int bob = 0; bob < NumBobs; bob++)
	{
		int xshift = bob * 2;
		for (int xchar = 0; xchar < BobCharWidth; xchar++)
		{
			for (int y = 0; y < BobHeight; y++)
			{
				unsigned char CurrentByte = 0;
				unsigned char CurrentMask = 0;

				for (int xpixel = 0; xpixel < 8; xpixel += 2)
				{
					int x = xchar * 8 + xpixel - xshift;

					bool bMaskedOut = false;
					if ((x < 0) || (x >= BobWidth))
					{
						bMaskedOut = true;
					}
					else
					{
						unsigned int Col = BobImage.GetPixel(x, y);
						if (Col == 0xff00ea)
						{
							bMaskedOut = true;
						}
						else
						{
							unsigned char OutBits = 0;
							switch (Col)
							{
							case 0x00ffffff:
								OutBits = 2;
								break;

							case 0x00808080:
								OutBits = 1;
								break;

							case 0x00000000:
								OutBits = 3;
								break;
							}
							CurrentByte |= (OutBits << (6 - xpixel));
						}
					}
					if (bMaskedOut)
					{
						CurrentMask |= (3 << (6 - xpixel));
					}
				}
				int OutBobMaskOffset = (((0 * NumBobs) + bob) * BobHeight + y) * BobCharWidth + xchar;
				int OutBobDataOffset = (((1 * NumBobs) + bob) * BobHeight + y) * BobCharWidth + xchar;
				OutBob[OutBobMaskOffset] = CurrentMask;
				OutBob[OutBobDataOffset] = CurrentByte;
			}
		}
	}

	for (int bob = 0; bob < NumBobs; bob++)
	{
		OutCodeASM.OutputFunctionLine(fmt::format("BlitBob_Shift{:d}", bob));
		int AValue = -1;
		for (int xchar = 0; xchar < BobCharWidth; xchar++)
		{
			OutCodeASM.OutputCodeLine(LDY_IMM, fmt::format("#${:02x}", xchar * 8));
			OutCodeASM.OutputBlankLine();

			for (int y = 0; y < BobHeight; y++)
			{
				int OutBobMaskOffset = (((0 * NumBobs) + bob) * BobHeight + y) * BobCharWidth + xchar;
				int OutBobByteOffset = (((1 * NumBobs) + bob) * BobHeight + y) * BobCharWidth + xchar;
				unsigned char MaskValue = OutBob[OutBobMaskOffset];
				unsigned char ByteValue = OutBob[OutBobByteOffset];

				bool bMaskIs00 = (MaskValue == 0x00);
				bool bMaskIsFF = (MaskValue == 0xff);
				bool bDataIs00 = (ByteValue == 0x00);

				if ((!bMaskIsFF) || (!bDataIs00))
				{
					if (!bMaskIs00)
					{
						OutCodeASM.OutputCodeLine(LDA_IZY, fmt::format("ZP_BobOutY{:d}", y));
						AValue = -1;
						if (!bMaskIsFF)
						{
							OutCodeASM.OutputCodeLine(AND_IMM, fmt::format("#${:02x}", MaskValue));
						}
						if (!bDataIs00)
						{
							OutCodeASM.OutputCodeLine(ORA_IMM, fmt::format("#${:02x}", ByteValue));
						}
					}
					else
					{
						if (ByteValue != AValue)
						{
							OutCodeASM.OutputCodeLine(LDA_IMM, fmt::format("#${:02x}", ByteValue));
							AValue = ByteValue;
						}
					}
					OutCodeASM.OutputCodeLine(STA_IZY, fmt::format("ZP_BobOutY{:d}", y));
					OutCodeASM.OutputBlankLine();
				}
			}
		}
		OutCodeASM.OutputCodeLine(RTS);
		OutCodeASM.OutputBlankLine();
		OutCodeASM.OutputBlankLine();
	}

	delete[] OutBob;
}
And here is the resultant ASM:-
  BlitBob_Shift0:

    ldy #$00                                                                                                        //; 2 (    0) bytes   2 (     0) cycles

    lda (ZP_BobOutY0),y                                                                                             //; 2 (    2) bytes   5 (     2) cycles
    and #$fc                                                                                                        //; 2 (    4) bytes   2 (     7) cycles
    ora #$03                                                                                                        //; 2 (    6) bytes   2 (     9) cycles
    sta (ZP_BobOutY0),y                                                                                             //; 2 (    8) bytes   5 (    11) cycles

    lda (ZP_BobOutY1),y                                                                                             //; 2 (   10) bytes   5 (    16) cycles
    and #$f0                                                                                                        //; 2 (   12) bytes   2 (    21) cycles
    ora #$0f                                                                                                        //; 2 (   14) bytes   2 (    23) cycles
    sta (ZP_BobOutY1),y                                                                                             //; 2 (   16) bytes   5 (    25) cycles

    lda (ZP_BobOutY2),y                                                                                             //; 2 (   18) bytes   5 (    30) cycles
    and #$c0                                                                                                        //; 2 (   20) bytes   2 (    35) cycles
    ora #$3e                                                                                                        //; 2 (   22) bytes   2 (    37) cycles
    sta (ZP_BobOutY2),y                                                                                             //; 2 (   24) bytes   5 (    39) cycles

    lda (ZP_BobOutY3),y                                                                                             //; 2 (   26) bytes   5 (    44) cycles
    and #$c0                                                                                                        //; 2 (   28) bytes   2 (    49) cycles
    ora #$39                                                                                                        //; 2 (   30) bytes   2 (    51) cycles
    sta (ZP_BobOutY3),y                                                                                             //; 2 (   32) bytes   5 (    53) cycles

    lda #$fb                                                                                                        //; 2 (   34) bytes   2 (    58) cycles
    sta (ZP_BobOutY4),y                                                                                             //; 2 (   36) bytes   5 (    60) cycles

    lda #$e7                                                                                                        //; 2 (   38) bytes   2 (    65) cycles
    sta (ZP_BobOutY5),y                                                                                             //; 2 (   40) bytes   5 (    67) cycles

    ... more code
In total, for all 4 functions, this came to 932 bytes and 1672 cycles .. ie. approximately 418 cycles per bob. Pretty good!
As you see, I have some zeropage pointer setup for each line of the bob.
The x-char of each plot is determined by setting Y to be $00, $08, $10, ..., $f8 (chars 0-31) and by setting the the high pointer of each ZP_BobOutY value to be +0 or +1.
The y-pixel coordinate of each plot is added into the low and high pointers of each ZP_BobOutY.
That's pretty much it for the actual plot .. it's then just a matter of having the sinetables setup to feed all of this data in to plot the bobs at good positions.
Clearing the End of the Bob Trail #
Since we have a background image behind the bobs, of course, "clearing" the bob trail isn't as simple as just blanking an area of memory out. We need to restore the charset data back to how it was before we plotted bobs on top.
That means that we need to keep a clean copy of the character set data in memory. And now maybe you understand why the image needs to be mirrored - we have 28kb of character set data so, if we simply duplicated that, we're at 56kb. Without considering code, music, sinetables, etc. That is.. it isn't happening ;)
So instead we need to squeeze 14kb of un-mirrored image data into memory, along with code/tables for re-mirroring that.
Now is perhaps a good time to look at our memory layout for the demo part:-
//; MEMORY MAP
//; - Loaded
//; ---- Generated at runtime
//; ---- $02-04 Sparkle (Only during loads)
//; ---- $fc-fd Music ZP
//; ---- $fe-ff Music frame counter
//; - $0160-03ff Sparkle (ALWAYS)
//; - $0800-08ff Disk Driver
//; - $0900-1fff Music
//; - $2000-3aff Code
//; - $3d00-3dff FlipBits
//; - $3e00-3eff FlipY
//; - $4000-77ff CharSets 0 <-------- 14kb of charsets in bank 1
//; - $7800-7bff Screen 0
//; - $7c00-7dff Sprites
//; - $8000-b7ff Image Data <-------- our 14kb of unmirrored image data
//; - $b800-bfff SinTables
//; - $c000-f7ff CharSets 1 <-------- 14kb of charsets in bank 3
//; - $f800-fbff Screen 1
That's pretty tight, right..? Still a few pockets of memory free - maybe I can use those if I ever do a "Not Bob's Bobs++" in the future..?
Anyway, back to the task .. we need to somehow clear the end of the trail. What I ended up with was a simple solution of resetting whole horizontal char lines (25% of a character set) at a time at points where I determined that it was safe to do so - ie. when that line has gone off screen and isn't going to be coming back for a while.
Without too much explanation, here's how I did that, along with the mirroring:-
OutYCharTableHi:
		.byte >(CharAddress0  + (0 * 64 * 8)), >(CharAddress0  + (1 * 64 * 8)), >(CharAddress0  + (2 * 64 * 8)), >(CharAddress0  + (3 * 64 * 8))
		.byte >(CharAddress1  + (0 * 64 * 8)), >(CharAddress1  + (1 * 64 * 8)), >(CharAddress1  + (2 * 64 * 8)), >(CharAddress1  + (3 * 64 * 8))
    //; ... more ...
		.byte >(CharAddress13 + (0 * 64 * 8)), >(CharAddress13 + (1 * 64 * 8)), >(CharAddress13 + (2 * 64 * 8)), >(CharAddress13 + (3 * 64 * 8))


RestoreHorizontalLine:

    ldx FrameY + 1
    ldy ADDR_SinTable_ScreenY_Clear, x //; <------ my sinetable defining which lines are safe to clear on any given frame
    bmi SkipClear
    tya
    clc
    adc #>ADDR_ImageData
    sta RestoreReadAddr + 2

    lda OutYCharTableHi, y
    sta RestoreWriteAddrLeft + 2
    ora #$01
    sta RestoreWriteAddrRight + 2

    ldy #$00
  RestoreLineLoop:
  RestoreReadAddr:
    lax ADDR_ImageData + (12 * 256), y
  RestoreWriteAddrLeft:
    sta $ab00, y
    lda ADDR_FlipBits, x //; <------------- ADDR_FlipBits simply points to my table for flipping all the bits in the char

    ldx ADDR_FlipY, y
	RestoreWriteAddrRight:
    sta $ab00, x
    iny
    bne RestoreLineLoop

  SkipClear:
    rts
The FlipY table is basically just a way to map from the left-chars to the right-chars.. so it's an 'EOR #$f8' essentially as we want to leave the bottom 3 bits (which contain the y-pixel) alone. In order to save disk space, an important consideration for this demo, we generated this table in the demo part's init() code:-
		ldy #$00
	SetFlipYLoop:
		tya
		eor #$f8
		sta ADDR_FlipY, y
		iny
		bne SetFlipYLoop
The FlipBits table is also fairly easy to create.. for this one, we need to flip the multicolour pixels from each byte ... so we would swap %AABBCCDD to be %DDCCBBAA.
    ldy #$00
  SetFlipBitsLoop:

//; step 1: 01234567 -> 76543210
    sty ZP_FlipBit
    ldx #8
  FlipAll8Bits:
    lsr ZP_FlipBit
    rol
    dex
    bne FlipAll8Bits

//; step 2: 76543210 -> 67452301 by making -7-5-3-1 and or'ing it with 6-4-2-0-
    pha
    and #$55
    asl
    sta V0 + 1
    pla
    and #$aa
    lsr
  V0:
    ora #$00
    sta ADDR_FlipBits, y
    iny
    bne SetFlipBitsLoop
Many thanks to Sparta for his help here - I'm honestly not a coder who could ever compete in such a 4k competitions.. as you can see above, and from my other parts, I tend to fill the entire memory ... so Sparta helped compact this snippet right down :-)
And with this done, we now have bobs swinging around the screen in a nice trail!
Final Complication - Sinus Movements #
Finding actual sinus patterns for both the bob plotting location and for screen movement offset was much harder than I'd imagined .. if you weren't careful, you'd end up with movements that left no room for clearing the bobs without the clear being visible. Double-sinuses would result in the bobs being visible "sliced", for example.
As we were only going to be showing the effect for 20 seconds or so - No Bounds does that throughout, trying not to dwell too long on effects, no matter how much we'd like to - we went with a simple circular movement in the end for both bobs and screen. To make the movement slightly more interesting, I made the tables a slightly different length (not just 256) so that the movement would slowly start to offset. If you want to see how it can go wrong after too long, go hack the code and figure out how to disable the ease-out trigger. We run with this version during development and, honestly, in less than a minute you'll see the problem I described creeping in.
Wrapping Up #
I believe that's everything, really? Apart from the glue that brings all of these things together - but that's the simple part, right?
I hope this was of some help and interest to some of you. We're a niche of a niche within a niche that actually cares about this.. there are of course those who like the final demo - that's a very small group since, let's face it, modern generations simply won't understand the interest in a 40 year old computer. But within this small pocket of people there's an even smaller section that really wants to know how.
Regardless.. if the final pocket is just one person, myself, I can at least look back on this 10 years from now, in the old people's home, and marvel at how my dying brain used to be able to do this almost pointless stuff ;-)
Until next time!
- Previous: Stopping Music Popping
- Next: Scrolling Bob Scroller